K8800 Printing and Calibration(?) issues

So I have a Vertex Delta printer given to me by a friend who isn’t very good with such tech and doesn’t speak or read english very well. I am supposed to get this thing working and show her how to do things she needs to print. It was assembled by her and on her first try the nozzle supposedly hit the bed so hard it made a hole. I was told that she contacted Velleman and they have exchanged the build plate and some part that was causing the problem with calibration.
Then the printer was laying idle for a year and how I have it.
I already have an Anet A6 printer and have some knowledge on how to do stuff on this one, but different construction of Delta throws me off a bit.
I use Cura 4.0.0 for slicing. Sleds are fine, piezo hit detection works right and printer with about 8-10 iterations levels the bed.

My first problem was lacking material near one of the sleds. I have leveled the printer with bubble-level laid on printing table in 3 different directions (corresponding to 3 legs). Now the whole printer is leveled and problem still presists.
Here you can see how thin the skirt is. It’s already better that it was previously.
I’m not sure whether the problem lays in leveling the bed or not extruding filament properly.

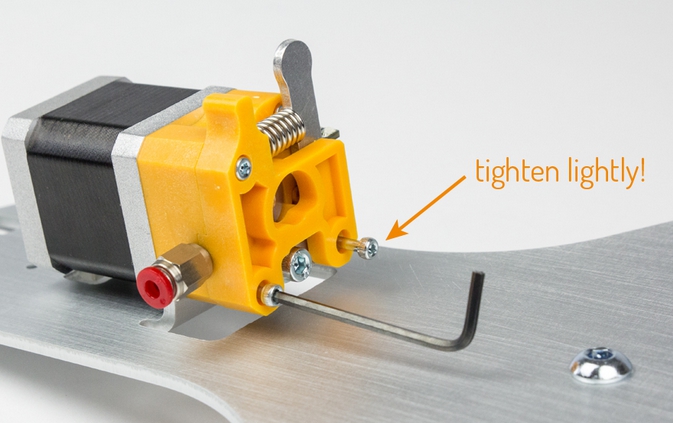
Another problem is the motor at the top pushing filament into the tube connected with the nozzle. At times it makes knocking noise and seems to be pulling PLA backwards. Today this was happening more often and the printer stopped detecting PLA midprint starting the filament exchange sequence and then having hard time extruding filament through the nozzle - no matter how many times I told the printer to extrude a bit more, it didn’t show up in the nozzle.

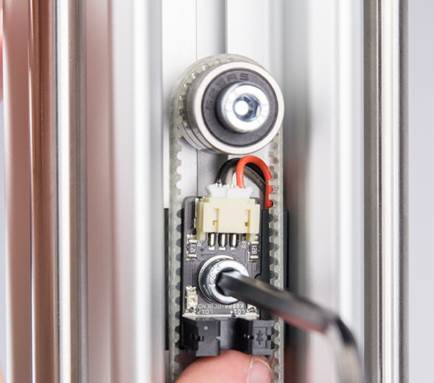
Third problem also occured today, but I had a glimpse of it previously. I wanted to see how the printer sees the axles X, Y and Z. When I turned the knob slightly the nozzle smashed into the bed, but not too hard and created this and another view of hole.
Today when the printer paused for filement exchange and didn’t want to extrude properly I autohomed it and restarted the print from point 0. I figured that since I didn’t restart the power it would remember the settings and would be okay without calibration. Boy, I was wrong. It smashed so hard it made a hole in BuildTak shown here and here.
When I turned off the printer and started next one with calibration everything was okay. The glass seems to be undamaged but hole in BuildTak warps the print bases and will probably need an exchange.

Also, is there anything I can do to stop the step enging belts from falling? Two days ago when trying out a print one of them fell off and whole printhead smashed into the print. One of the reasons could have been the fact that the belt was a bit loose. I stretched it harder and checked the others, but I’m afraid they will again fall off.

Be sure to save the settings afther you did the calibration. Are your belts tight enough? Normaly they never fall off.

Yes this seems like the belts are not tensioned enough.

Dear, Check also this:

Rather, it is the cause of a defective piezo sensor, calibration not performed properly, or end stops not mounted at the correct height, or bed straining between the studs, Belt tension not good.

on the pictures is seen that printhead is crashed onto the printbed. Maybe calibration was not oké due facts above. Before first use, Calibrate the printer in the following way.

Go the menu Vertex calibration:
1: Do AUTO HOME.
2: Do Calibrate HEIGHT.
3: Do Auto Calibration.

If printer head still crash onto bed, check these things below.
Maybe the problem could be a bad piezo sensor.

Check these things if it’s okay.

1. Mount end stops at correct height:

Loosen the mounted end-stop board (PCB) and slide upwards to approximately 0.5 cm below the pulley. Re-tighten to secure. Also Tighten the belts.

In other words: 1 cm between the bottom of the roller bearing and the top of the female connector END-STOP PCB.

Note: Also Tighten the belts.

image

2) Check the piezo sensors:

Remove the glass plate from the base. Turn on the printer and gently tap the piezo (on the black part) with 2 fingers. The red LED should light up with every tap.

If this is not the case, the piezo is broken. Spare part: can be requested via ticket system.
Support ticket via: https://customercare.velleman.eu/

Or shop: https://vertex3dprinter.eu/product/piezo-sensor-spare-part-set-for-vertex-delta-3d-printer/

3) Check buildtak:

Builtak that is glued to the glass, its edge must be cut off.

image

Bed may not tension between the studs. If so, file all studs (inside).
Place the print bed on the 3 piezo sensors. Make sure the bed is not clamped by the 3 gray alignment plates (studs).

Allow a little play to allow the calibration routine to slightly tap the bed. If (due to manufacturing tolerances) the bed is clamped between these plates / studs,
scrape (or better file) a little bit of plastic from all studs until the bed fits loosely.

4. Check whether the 2 nuts are tight at the ends of the 6 x DIAGONAL rods.
If this is not the case, use 2 Allen keys to tighten the nuts

image

After all these things are checked up, and found to be good, (maybe solved or improved),
=> RECALIBRATE THE PRINTER!

Go the menu Vertex calibration:
1: Do AUTO HOME.
2: Do Calibrate HEIGHT.
3: Do Auto Calibration.

Hoping to have sufficiently informed with this.
Please let us know if this resolves the issue.

Ragards,
Velleman Support

1 Like

I put Teflon (plumbers) tape on the end rods to keep them in place.
Never had a problem with them since.

Thanks for the replies, but of all the problems mentioned here crashing head is the least, because I think I have had it already fixed by the time I was writing the original post.
Do you have any ideas on what could be the cause of missing filament in printed object?
That was the first problem that occured and I still cant figure what else could be done to fix that one.

Just a thought.
Check this screw and make sure it’s not to tight

3348

I think I’ve gotten over all the issues but one. I’m having hard time finding what causes my Delta head to be too close to the bed resulting in thinner 1st layer than intended.
Currently before starting the print I do the following: Auto calibration > Save Settings > Start printing from SD card. After leveling the bed through printer feet with a level the problem got smaller but it’s still noticeable enought to cause problems with extruder.
Any ideas what could be causing this?

Did you calibrate the height?

I did. It doesn’t with that problem at all.

Have you done this in the link?
https://manuals.velleman.eu/article.php?id=771

Yes, I did, everything is fine with this calibration.

I have the same problem…
does not want to calibrate
if it is calibrated after 8 hours of printing, the metal rods will come loose
when it is calibrated, the rods suddenly come loose
I have already had to buy a new printhead because it was broken off by drilling into the printbed
i don’t like it anymore :cry:

What do you mean with the metal rods come loose?
The arms?
Also clean the bottomside of the glassplate and just remove it from the sensors for a while.
Are your arms mounted correctly? They have the be parallel to each others?

If the screws for the cups that hold the magnetic balls are coming loose.
Try wrapping Teflon (plumbers tape) around the threads.
Try about 3 wraps.
This fixed it for me.

I also wanted to say that doing it this way you can take the screws out without any problem.

the cups are tight but he also does not calibrate properly. middle calibration fault detected …

You may need to check the Calibration sensitivity.
See this chapter.
https://manuals.velleman.eu/article.php?id=771

all piezo elements work correctly. also another problem, during calibration I always get the message ‘fault detected …’ after trying a few times it is calibrated but once it prints it does not print evenly over the entire ‘buildtak’

Does the Buildtak have any air bubbles in it?
On a few of the builds I have noticed that some have mounted the head wrong and the cable assembly did not have the proper twist in it.
Without seeing your printer or a videos of the failure it’s hard to say what the problem might be.